Monday, December 22, 2008

Carpet & other stuff

After talking with some friends and family that had recently purchased carpet we ended up going to Home Depot based on their experience. They have a $199 install fee and a wide selection to choose from. We knew we would be spending a lot of time on the floor, so we were strongly considering the polyester for the softer feel even though it would "shed" for the life of the carpet. Then we found a Shaw branded Nylon product called EverTouch R2X. Basically a Nylon carpet that doesn't shed, but it feels like a softer polyester. We were sold... and it was a rapid install selection as well, so we could have it installed quickly. We ordered it on Friday 12/5, a service came and measured on the 9th, and it was installed on the 18th. The color of the carpet is Sugar Cookie... how can you not love that?

The walls got a little scuffed in spots where the installers were un-rolling the carpet. They warned us that would happen. It really isn't that bad though.... all surface marks I can either wash or paint over. I ran around last night and marked the spots with tape so I can touch them up later.


We went with a waterfall install style on the stairway.

I pre-wired for surround sound speakers, and installed screw terminal wall plates for the speaker hook ups. I used the Leviton "quick port" system. Basically they have open ports in the wall plates and you purchase clip in features depending on what you want to do.

I installed a new Kiddie AC/DC smoke detector where the old smoke detector was in the room. It's hardwired and linked in with the rest of the system. When any one detector is activated, all the other detectors sound the alarm.

Paint & Lights

The painting is done save for some touch up spots. For the wall surfaces, we chose a neutral color "distant tan" PWL-83 from the Behr White & Light collection at Home Depot. I was very happy with the paint coverage over the Kilz primer as only one finish coat was required. I used an interior eggshell finish as it hides marks much better than a flat and isn't as "shiny" as a semi-gloss. I'm going to put a short crown molding on the ceiling interface in the front side of the room, so you can see in the pics below that I just rollered up to the ceiling and didn't bother with trim work.

The previous homeowner had left a can of Duron brand paint they used on the walls and ceilings in the rest of the house. I wanted to try and match that for the ceiling, so I painted a piece of scrap drywall and when I was at home-depot picking up the wall paint, asked them to match it. They tried to match it with an eggshell and failed miserably. I'll give them the credit that they didn't require that I purchase it. I asked them to try with a flat finish, and they got close enough that I almost couldn't see the difference. I ended up using this also for the stairwell. I've always been a fan of Behr paint and after this experience, I still am.

For the trim paint, the previous homeowner had left a can of that as well, but this one had a full label. Rather that take a gamble matching at home depot again, I looked up Duron and was suprised to see they had a store right in Lancaster. I stopped in over lunch with the info and they were able to look it up and mix up an exact match on the spot. Sticking with tradition, I'm using a semigloss finish.

Here's some pictures after cleanup....


The main room has 10 6" recessed fixtures and I have one 4" fixture at the bottom of the stairs. I decided to finish these out with a standard black baffle and white trim rings. The fixtures were Halo brand, but I used Commercial Electric brand baffles as they were a few dollars cheaper each. They installed fairly easily with two extension springs engaged in slots in the recessed housing. I put in 65Watt BR30 interior floodlights to replace the standard incandescent bulbs I put in for the rough in inspection. The floodlights are great because they have a softer light and don't buzz. The 4" fixture got a 45W R20 bulb.


Wednesday, December 10, 2008

Primer

Arrggh.. so I found the bad primer and the good primer for this project. I was at Lowes using up a gift card and bought 2 gallons of the Valspar premium primer to put on the drywall.

It was noted to be "tintable", but most of the other brands said that as well. Maybe that was my mistake, but anyhow.. 2 gallons later, it looked like I hadn't done anything. You might not believe it, but the right side actually has a coat of this stuff on it.
I gave up at that point and went back to the Kilz primer, which was the same cost and worked great. Easy application and good coverage.

Thursday, November 6, 2008

Drywall

So I don't mind hanging drywall, but I just don't like to tape & spackle. A friend recommended Richard S. Lapp drywall in New Holland, so I called him to quote the job. At the end of the day, for the cost, I decided just to let him do the entire project. For me, it's well worth the investment to get it done and look great in about a 1/10th of the time that it would take me to do it. If you live in the area, and need some work done, his phone number is 717.286.4631.

Richard came out to look at the job on Saturday, we agreed on the project on Sunday, and his supplier delivered the drywall Monday. Tuesday, almost the entire room was hung. Wed and Thursday he has been taping & spackling.

The space looks great so far.


Sunday, November 2, 2008

The engineer behind the curtain

So Allison thought I was a little crazy early on in this project when I built a model of the basement as a solid model in CAD. I thought it was a nice way to determine how walls would look and once I settled on a design, it made it easy to count-up material requirements.


I'm happy to say I had one scrap 2x4 after all the framing. I think I'll do it again for the entertainment center and shelving. For me at least, it helps a lot to see it before I get started.

Insulation

Final step before drywall was installing insulation. Lowes had a sale on R13 rolls of Owens Corning faced insulation at $10 a roll. The pre-cut bat insulation was almost $40 for 13 pieces. Each roll would cover 4 joist spaces with a little scrap. So this worked out to $30 for 12 pieces. I was happy cutting to length, so for what I needed, it was about $60 cheaper to get the rolls.


I didn't have a stapler, so it was time for a new tool. Home Depot had the Ryobi One plus stapler on clearance for $45. What a great little stapler. It accepts a variety of staple lengths and has a simple dial to adjust the hammer force. I installed all the insulation on one charge with plenty reserve, and I had no staple jams. I dropped it off the ladder several times with no cracks and no functional issues.


Here's a picture coming in from the unfinished space in the basement.


And from the bottom of the stairs.

I stitched two pictures together with some issues around the treadmill, but you get the picture.


It's noticibly quieter with the insulation in, and looking a lot more like a functional room.

Fire Blocking

So summer is gone and so is most of the busy yard work and weekend activities that somehow absorbed all free time available. The basement is getting some renewed priority in life, and I'm making good progress again.

I passed rough-in inspection with no problems back in September. A framing inspection wasn't required because of the scope of the job. The electrical inspector only had one comment about considering fire-blocking the airgaps between the stud walls and the ceiling space. He noted that this is required for new contruction, but that it was up to me whether I wanted to do it or not here. It seemed like a good suggestion, so I did it.
There are two instances to resolve with fireblocking. The first is that the stud walls are offset from the foundation wall. As a result, there is a continuous air-gap behind the wall. In the event of a fire, the fire can travel continuously around the room with no inhibitors. To stop this, it is recommended to block in behind a stud every 10 feet. The second issue is at the top of the stud wall, where again, there is a air gap. Here, there is an uninhibited path for fire to run up into the joist space and travel from there. The solution here is that you fill this space to eliminate the gap.
Picture on the left shows the airpath for the 2nd issue, and the picture on the right shows the fire blocking element in place (purple).
A quick online search revealed several approved methods for accomplishing this. Rock wool was the most popular for hard to fill spaces that didn't have a lot of flat surfaces. It's basically fireproof insulation that you can jam just about anywhere. The two other methods were to install fire-resistant drywall and/or use fire-resistant expanding foam.
I chose a combination of the latter two because I had simple, straight sections to fill.
I found this great stuff fireblock expanding foam at home depot. It was just under $10 a can.
In this picture, you can see the expanding foam along the top and behind one of the vertical studs.
Here, you can see the fire-resistant drywall installed between the stud spaces. I then used the foam to fill the gap behind the studs, and around any wire-drops.
The vertical gap was too big for the foam in all but two locations. So I just used the drywall.

Sunday, August 31, 2008

Call for inspection...

The call has been made to schedule a rough-in inspection. Finally, all the electrical hardware is in. Mom & Dad were down a few weekends ago and dad helped me snake the leads through the wall for the switch on the stairway. The 4" recessed light is in place at the bottom of the stairs and is switched at the top and bottom of the stairway. The finished space lighting is split in 2 zones, with 3 way switches. I have dimmers at the bottom of the stairs and standard switches at the door into the unfinished space.

I pretty much gutted all the basement wiring that existed and ran new wiring for the existing basement circuit. I installed 4 lights in the unfinished space where there was only 1. This made a huge difference and will help a lot when it's closed off. These lights are also on a 3 way switch at the bilco door and at the door into the finished space.


Wiring for the play side was fairly straight forward. The 2 recessed lights in the soffit are included in a switched circuit with 2 outlets. I plan to install drop ceiling on the side with the outlets so I figured it would be easiest to terminate the recessed fixtures with a plug so I could remove them easily if I had to.


I finished around the pole with 2x3's. I used the concrete nails to fix the treated base in place. I wanted to have space for an outlet and leave the front of the finish feature flush with the soffit side above to eliminate any steps in the drywall. I made it 7-1/4 square. I put this outlet in after the fact, so I had to pull back some wiring to include this in the circuit, but that was easy. I think I'll go back and put some support blocks in to keep the 2x3's stiff enough. I don't want to have the drywall cracking every time someone bumps it.

The only thing I have left to do is hang the smoke detector in the planned unfinished space, terminate the phone line and run the speaker wires.

Wednesday, July 23, 2008

Electrical update

I removed the entire circuit that included the burned looking wires. I dissected the wire at the location of the marks and found no internal evidence that the conductors got hot. The paper on the ground wire wasn't discolored, there was no flow on the insulation of the common or hot lead, so I'm at a loss. It was some extra work to remove and replace, but at least I feel better about it.

Sunday, July 20, 2008

Existing issues

I'm putting a single recessed light at the bottom of the stairs and I plan to re-use the 3-way switch at the top of the stairs so I don't have to pull new wire. I pulled out the insulation below the wire drop to see where the wires went, and was quite disturbed to find burned insulation paper.
There is only one original circuit in the basement, and I haven't touched it yet as my new fixtures are on new circuits from the panel.


Looking up into the space, there is matching residue on the wire insulation, but it's strange that it doesn't appear melted at all. We've been in the house for 2 years and never smelled anything, or had issues with this circuit.

My only assumption is that during the original wiring, they mis-connected one of the three-way leads and tried to operate the circuit. This theoretically should result in a dead short, so I'm suprised that the breaker stayed on long enough to result in this kind of artifact.

For now, I think I'm going to look at other parts of this circuit and see if there are any additional examples of this kind of problem. If not, I may pull this section of wire out and replace it, just to err on the side of caution. I wonder what the individual conductor insulation looks like inside??

Ceiling Work

I finished wiring the 6 recessed lights on the primary side. I used a traditional 3-way wiring scheme running power to the first switch, 3 conductor to the 2nd switch, then on to the fixture group. Everything worked the first time with no issues.
I used Lutron dimmers and I'm pretty impressed with their product. There is no noise when the dimming function is used, although it does put out some heat. I ended up choosing the traditional flip style with the small dimmer slide. I thought about the paddle switches, but we don't have any of those anywhere else in the house, so I stayed with the common theme.
I finished the soffit under the ducting by connecting both drops with a 2x3 laying on it's side. I predrilled holes in the 2x2's on the bottom of the drops, then drove 2, 3-1/2" screws into the ends of the 2x3's. This worked well to keep them from rotating.
It's almost a 7 foot run for the 2x3's, so to provide support when the drywall is in place, I put a 2x2 tie down the middle, and connected periodically up to the floor joists.

Wednesday, June 18, 2008

Electrical Update

Well.... it's been a while since I updated this. We went on vacation the third week of April, and when we got back, weekends were killed for most the month of May. Anyhow, I'm back on task and working again.

I was able to un-mount the panel from the backing board and square it up, so at least is straight on the wall now. After doing that, I framed the rest of the way around it to eventually support the drywall.

I finished the drop on the other side of the duct run down the room. It's identical to the front side in construction.

I've run all the outlet wiring. I had originally submitted plans for using 12ga wire and running a single 20A circuit. I ended up splitting the room into two home runs and using a double 15A breaker. This allowed me to use standard 14ga circuit wiring. It also made the wiring runs easier. After wiring the panel, everything stayed on after I flipped the breaker. Yeah!

I started installing the lights this past week. The recessed fixtures are fairly simple. I'm going to use 3way switches and have a gang of switches at the bottom of the stairs and also at the door to the unfinished space. I'll put dimmers at the bottom of the stairs to let us control the lighting levels. I'll rip out the existing fixtures and wiring as soon as I get the new ones in.

Monday, April 14, 2008

Almost done with framing

I more or less completed the framing effort this past weekend. The only thing that's left is to tie in the soffit under the ducting, and frame around the post.


The back wall was pretty straight forward. Because I'm going to have a drop ceiling in this area, I planned to run the stud walls less than full height. This made building a lot easier (and quicker) because I could just cut to length, build on the floor and tip up into place. Once positioned, I glued and nailed into the concrete and then created ties into the joists to locate the top plate plumb.

The partition wall was a little more complex because I had a shorter section to run under the duct, then back to standard height for the remainder of the wall.

I centered the door in this section, leaving about 25" between the door frame and the back foundation wall. This will be perfect for 24" shelving in the unfinished space.


The long side wall went quickly as well. The only hiccup here was framing around the panel, which turns out is hung crooked on the wall. I'll remove the service outlet later on and put a stud on the right side to tie in the drywall.


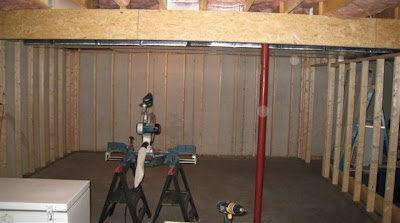
Here's a shot of the playroom side of the basement. You can also see the finished soffit drop on the beam side here.