Monday, April 14, 2008

Almost done with framing

I more or less completed the framing effort this past weekend. The only thing that's left is to tie in the soffit under the ducting, and frame around the post.


The back wall was pretty straight forward. Because I'm going to have a drop ceiling in this area, I planned to run the stud walls less than full height. This made building a lot easier (and quicker) because I could just cut to length, build on the floor and tip up into place. Once positioned, I glued and nailed into the concrete and then created ties into the joists to locate the top plate plumb.

The partition wall was a little more complex because I had a shorter section to run under the duct, then back to standard height for the remainder of the wall.

I centered the door in this section, leaving about 25" between the door frame and the back foundation wall. This will be perfect for 24" shelving in the unfinished space.


The long side wall went quickly as well. The only hiccup here was framing around the panel, which turns out is hung crooked on the wall. I'll remove the service outlet later on and put a stud on the right side to tie in the drywall.


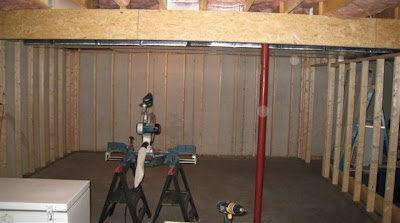
Here's a shot of the playroom side of the basement. You can also see the finished soffit drop on the beam side here.


Monday, April 7, 2008

More Framing

I made some more progress this past weekend with the framing efforts. I tore down the existing railing and faux post at the bottom of the stairs and framed it in. With the new wall, I left 1/2" between the back of the studs and the stairway stringer for drywall on the back side. I also framed in the offset wall.

On the back wall, I started framing over to the beam. Here, I was able to frame in place on the floor and tip the wall into place. The first time I tried, I ended up being off by about 1/8", so I couldn't tip the wall into place. So back to the floor, rip off the top plate, trim the studs, and nail everything back together. I'll be a little more conservitive with my measurement next time.


To box around the beam and provide a nailer for the drywall, I placed a 2x2 nailer on the top plate, and then sheathed around it using some 5/8" OSB.
I have another 2x2 nailer on the bottom of the OSB panel that the soffit structure will tie into.
Above is the front side and to the right is a picture from the back. You can see the 2x4 blocks I put in to keep the panel square with the beam.


Here, you can see the area that I will have to soffit around. The plan is to hang a panel on the right side of the duct run similar to the one I ran down the side of the beam. I'll run 2x4 stringers between the panels, tipped on their side to keep the ceiling height maximized. I'll also run supports up to the joists between the duct and the beam periodically to keep the 2x4's from sagging over time with the weight of the drywall. I'll probably run the stringers every 24" and space them to align with the light locations.

Monday, March 31, 2008

Getting Started

I finally committed to getting started on the walls this past weekend. Thanks to a friend for letting me borrow his truck. An early run to Lowes, and several trips down the bilco door carrying lumber and I was ready to go.

The first order of business was to determine the wall placements. I started on the back wall where the circuit panel is located. The panel is fixed, so I had to locate the wall respectively so everything would line up flush after the drywall was installed within the "flex" feature of the panel front. I started by dropping a plumb bob using the first floor joist as my reference. I backed into the stud location next to the panel and determined the offset to the plumb bob mark. Using this offset, I determine the stud location from the joist in three other locations to snap a line. I doublechecked the line by dry fitting the base 2x4's on these marks to make sure the foundation wall didn't move into the space I needed. Thankfully it didn't. The closest spot leaves about a 1/4" or so between the back of the stud and the wall.

On the front wall, I have a small section where the concrete flowed in about an 1" more in than everywhere else. This would be my determining location for the wall, so in this case, I dropped a plumb line from the center support beam in the middle of the room and measured over. Using the center beam again as my reference, I placed two more marks at this offset distance and snapped a line for the base stud location. This method worked great and I set to work building the wall. So I didn't have to deal with tipping the wall sections up and shimming them in place, I framed everything in place. After marking stud locations, on top, I nailed the plate to the bottom of the joists. On the bottom, I used a combination of construction adhesive and concrete nails every 16" to fasten the treated lumber to the floor. The studs, I just marked off to length and cut them on the miter and toenailed them in place. In most of the locations, I used screws on top and the nailer on the bottom just because it was easier. Even at 110psi, the nailer drives screws all the way when perpendicular to the board, but usually leaves an 1/8" or so out when nailing at an angle. Here's the front wall complete. As you can see, I opted to line up the stud spacing with the first floor joists to keep it simple.

Tools...

To finish this project properly, I'm building up my arsenal of tools. Here's a few brief review comments.

Instead of going through the hassle of drilling and installing tapcon screws to fasten the base 2x4 to the floor, I purchased a single shot handheld concrete nail gun. It was available at Home Depot for just about $20. There are several 22 caliber charge levels depending on the material you are fastening into. I'm using the yellow caps for fastening into poured concrete floors. So far, it works fine considering the price.

Two comments though:
1. The impact element is simply the top of a stud with a hex nut. I hope I never have to remove the nut because it quickly peens over after a few uses.
2. The surround feature is plastic, and the first time I dinked it with the hammer, it split as you can see on the left. It still works fine, so it's a soft failure, but still kindof cheesy. I guess for $20, I shouldn't complain.


To help with creating the stud walls, and also for some future cabinet plans, I purchased a reconditioned Campbell Hausfield air-nailer set online from CPO Outlet tools. It was one of the few that included a framing nailer, so I went for it. All the online reviews complained of the nailers not staying in the carrying case. Same issue here. They are a simple compression fit in their "cavities", and the fit just isn't enough to hold the nailer in place when tipped vertically. I've used the framing nailer thus far with no issues.


And finally, the quality purchase. To properly trim out the space and also to satisfy a manly desire for a bigger than life saw, I ordered a 12" fixed pivot, dual bevel miter saw through work.

They delivered directly to the house by FedEx within a week of placing the order.

So far, I'm extremely pleased with this tool. The up front controls are very nice, and it makes fantastic cuts with almost no effort. The blade brake allows for quick successive cuts, and the clamp features are simple and effective. The outriggers support an 8' 2x4 with no problems. I haven't installed the laser illumination yet, so I'll update when I do that.

Water Plumbing Re-route

On the left side of the room, I want to install the drywall on the bottom of the 1st floor ceiling joists to maximize height. There were three plumbing lines that were run below the bottom of the joists and would have to be re-routed. The H&C supply to the 1st floor bath (shown left) and an outside faucet run.

I elected to just shorten the vertical drops and run the cross runs tucked up between the joists (shown on left).
Over at the outdoor faucet feed, I drilled through the middle of the joist and ran the line through. (shown right)


For the bath supplies, I didn't feel like drilling holes in the joists, so I crossed over behind the center beam in an area that will be covered by a soffit for the ducting. The previous runs ran out straight, then crossed over under the joists.


I started around 8:30pm and it took about and hour and a half to get everything cut, dry fit and then glued into place. They recommend 2 hours for the CPVC glue to cure before pressure testing, so I digressed to watch a movie.


12:15am I head down there to turn on the water and although I had high hopes for my mad gluing skills, sure enough, I get back over to the area of work and water is already spraying… not a deluge, but a leak nonetheless. So I climb up on the ladder with a bucket to catch the spray (1/4 full with water from the previous draining efforts) to look around.

All of my glue joints had held, but one of the original joints had developed a pinhole spray. Figures that it was the one (and only) joint in the joist space above a heat duct… (hardest to get to). It's the one up behind the duct in the picture on the left. Yeah!!! The only root cause I can think of was that the joint flexed when I was cutting off the original section and the glue joint cracked. It causes me a little concerned about the stability of the rest of the plumbing in the house, but I guess pretending the risk isn't there is the best solution.

So I run over and turn off the water and head back to fix it…. 12:30am now. Back over at the ladder, I bump it and the pail of water balancing on the top step sailed all over me. So now I'm soaked, have a water leak, and there's a gallon of water on the floor running under my pile of 2x4's. I said some bad things.

Luckily, I had a few leftover elbows, so I was able to contort myself into the space with my mini hack saw to cut out the offending joint and replace it. Here's the fix on the right. I used two 45's because I had used all my 90° elbows.

I hit the sack at 1am, but of course, needed water in the AM. In a valiant attempt to stave off potential issues in the morning, I got back up at 3am to check it. All is well this time…save for a short night of sleep.

Sunday, March 30, 2008

Sump Pump

The first order of business was to install a backup sump pump. Our house is positioned in an old field and is at a low spot relative to all the other houses around. The yard is graded away from the house, so we never get water laying right outside the door, but... we do get a moat from time to time if it rains heavily. There are two drains that empty into the sump pit. When it's very wet outside, the sump pump does run fairly regularly. I've never had dampness or water in the basement, so the drainage system is effective. Considering how much the pump runs when it's storming, I've always been nervous about "what would happen" if the power went out during a storm and the primary pump couldn't run. Time to fix that......


I talked with some friends and the most popular solution was a simple battery powered backup that you drop in the sump pit next to the primary pump. So off to our local home depot I went. They had one model available, so I purchased it. Be aware that the prices for the pumps don't include the battery. The battery itself is essentially a deep cycle marine battery. You can use any battery you want, but I chose the pre-packaged battery for the pump system. It has an included port for the controller to monitor battery solution levels. At just under $250 for the entire system, it's cheap insurance to protect the investment of the finished space in the event that the power goes out during a wet storm.

The plumbing project was fairly easy. The old check valve had deteriorated and the flapper had a big hole in it, so I installed two new checkvalves for each pump output and plumbed them together. Here's a picture of the install completed. The backup sump has a small controller that trickle charges the battery, monitors the fluid level and goes into an alarm condition if the backup pump is ever actuated.


For this little project, I got to use the sawzall I purchased on a reconditioned tool firesale at work. It's an 8.5amp Skil, and it worked great. I'm very happy with the tool overall. The trigger is on-off, but it has a separate variable speed selector on the side of the handle. The blades are easy to install and remove without tools.


Pre-Project

This will be a brave attempt at documenting my basement finishing project. We need some dedicated play space for our son's toys, exercise equipment, and ( .... a home theatre.)

Here's a few pre-project pictures. On the right is a shot from the bottom of the stairs. The builders left almost 8' between the floor and the bottom of the 1st floor joists, so the finished room will have a standard height ceiling. On the right side of the room, the heating ducts, and most of the mechanicals (gas & water) are run below the joists. Clear space under the duct is just over 7'.

I've done some work in the past helping friends and summer odd jobs with new and remodel construction, so I'm fairly confident in my building skills. This should be a straightforward project, but we'll see as time goes on! It's my biggest project yet by far around the house, so of course, it's an excuse to buy tools. I'll try to post and review anything relevant...

I checked with the local township and was informed that I only had to apply and receive an electrical permit because I will be running new circuits for outlets and lights. I did this two weeks ago (simple form and a sketch of the plans). The township called me this past Friday and said my permit was ready. $134 for the permit fee. I'm not sure if this includes inspections or if I will have to pay for those separately. We'll see.